A Step-By-Step Guide on the Import Process
Here is the documentation that details each step of the import process, ensuring full transparency for the community.
The Arbogen platform allows the import of genomic sequences for dengue viruses (and in the future other arboviruses), together with detailed associated metadata. The data will be stored in the database according to the data governance model defined as part of the LSDengue framework.
The process consists of three main phases:
- Phase 1: Files Selection
- Phase 2: Sequence Processing
- Phase 3: Import Results
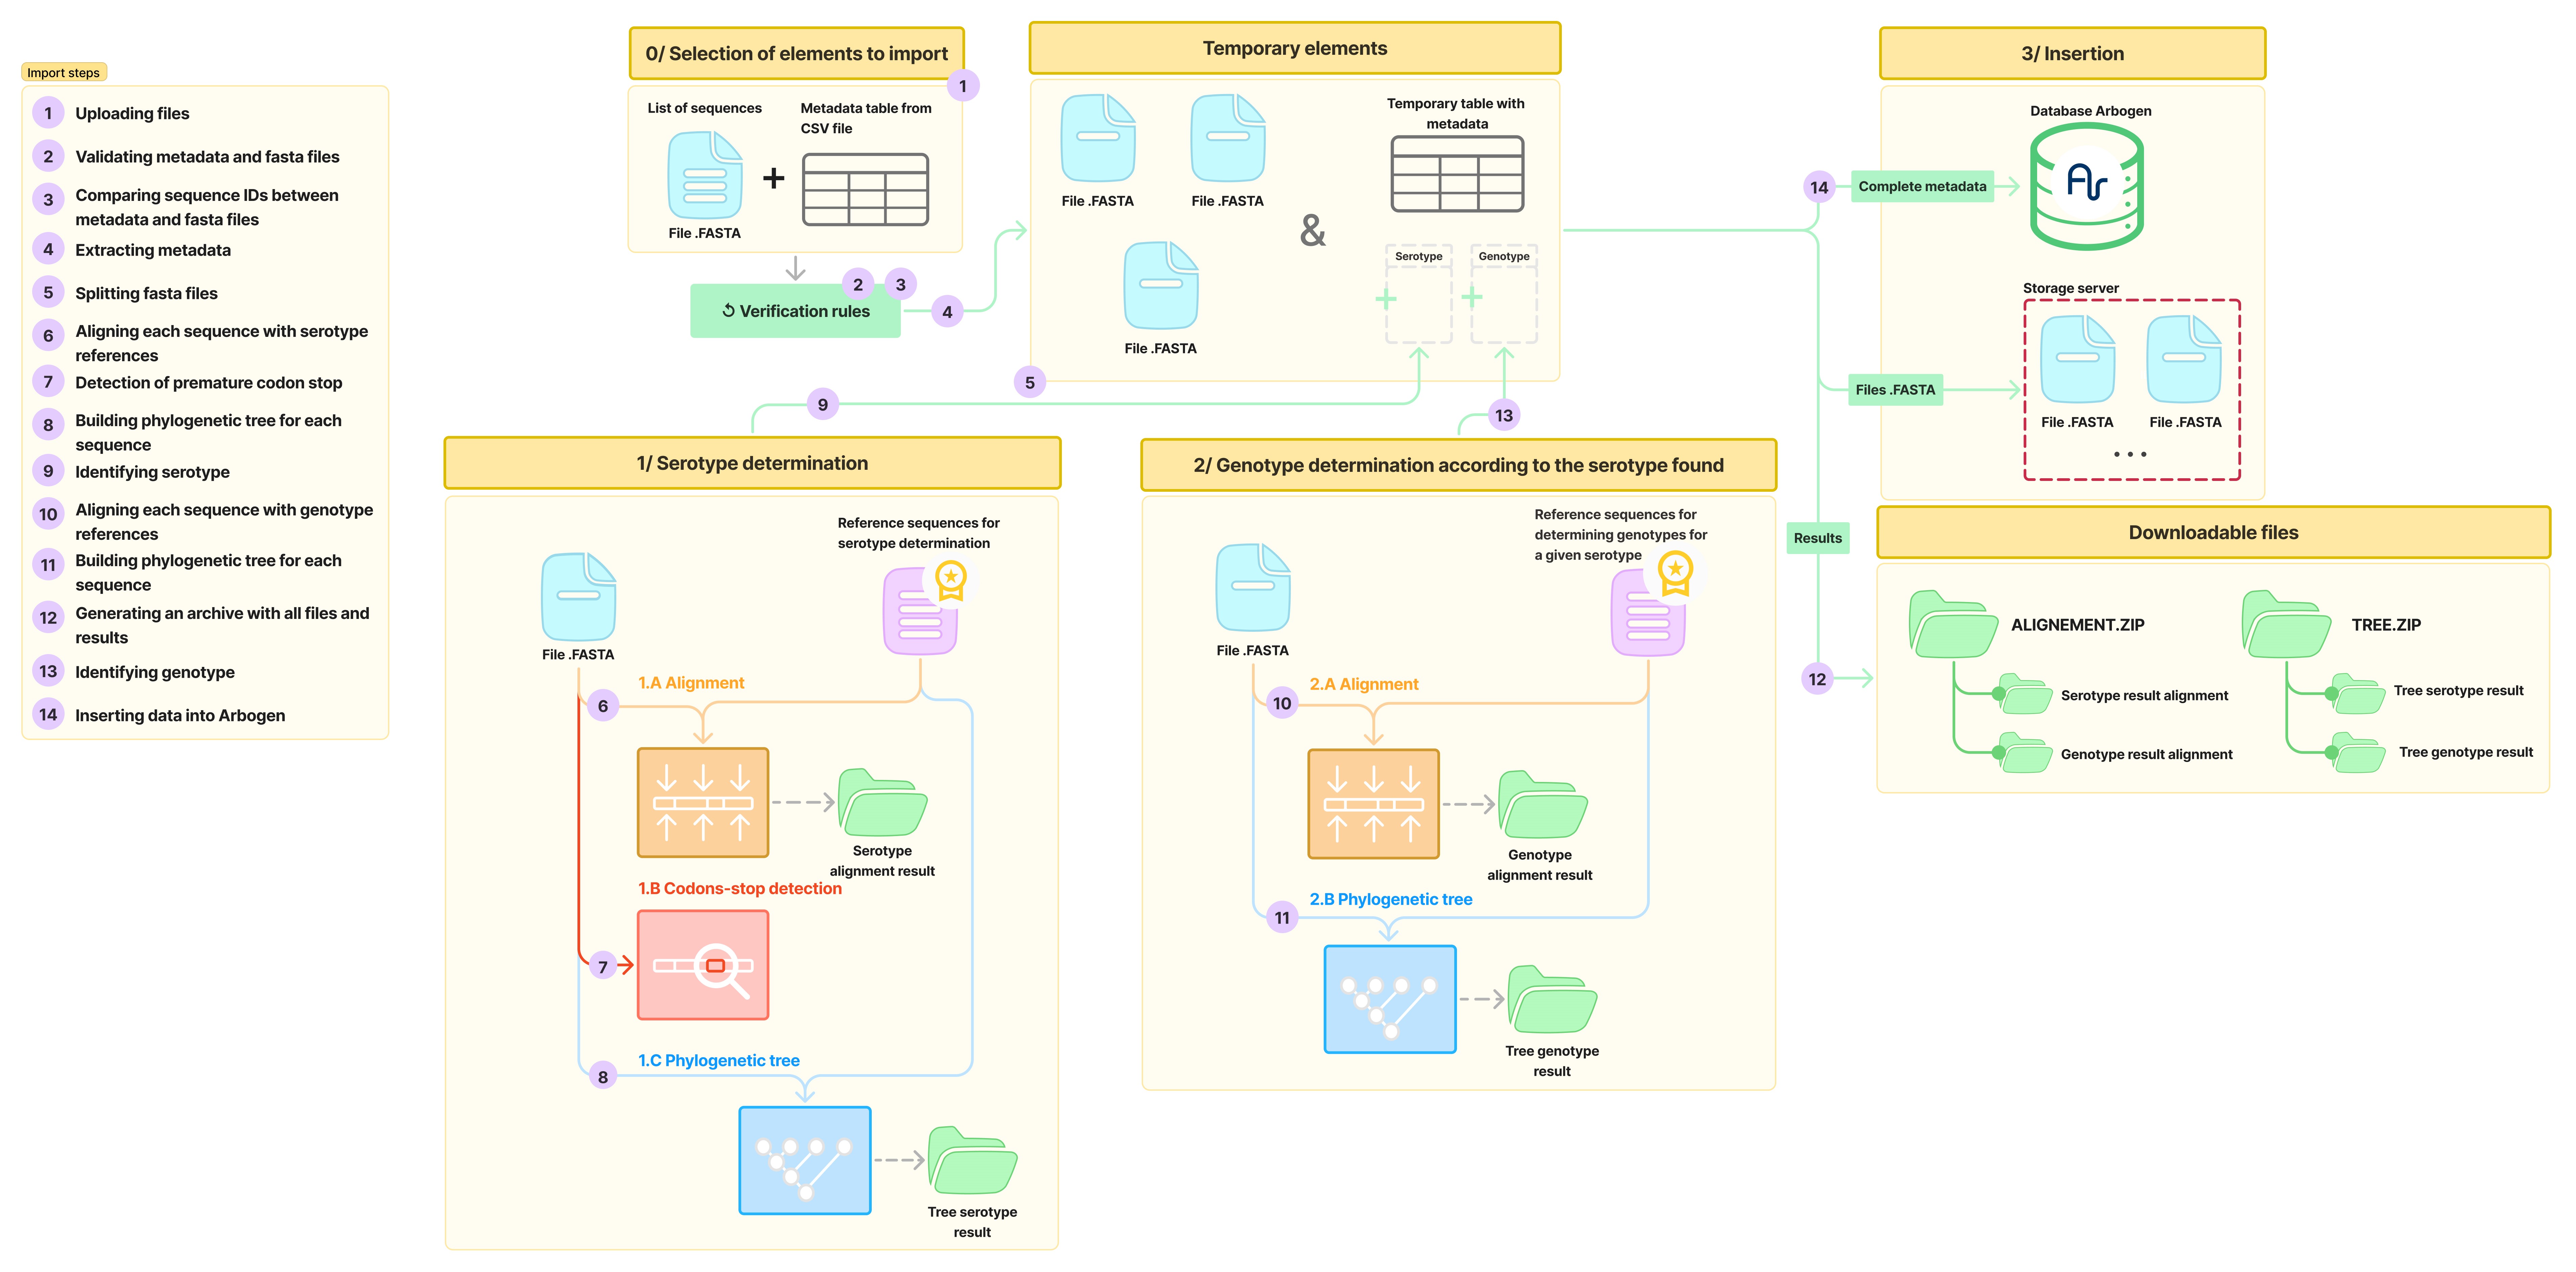
All the steps are illustrated in the following diagram:
During each of these steps, multiple operations are carried out. They are displayed on the Arbogen platform interface throughout the import process.
Phase 1: Files Selection
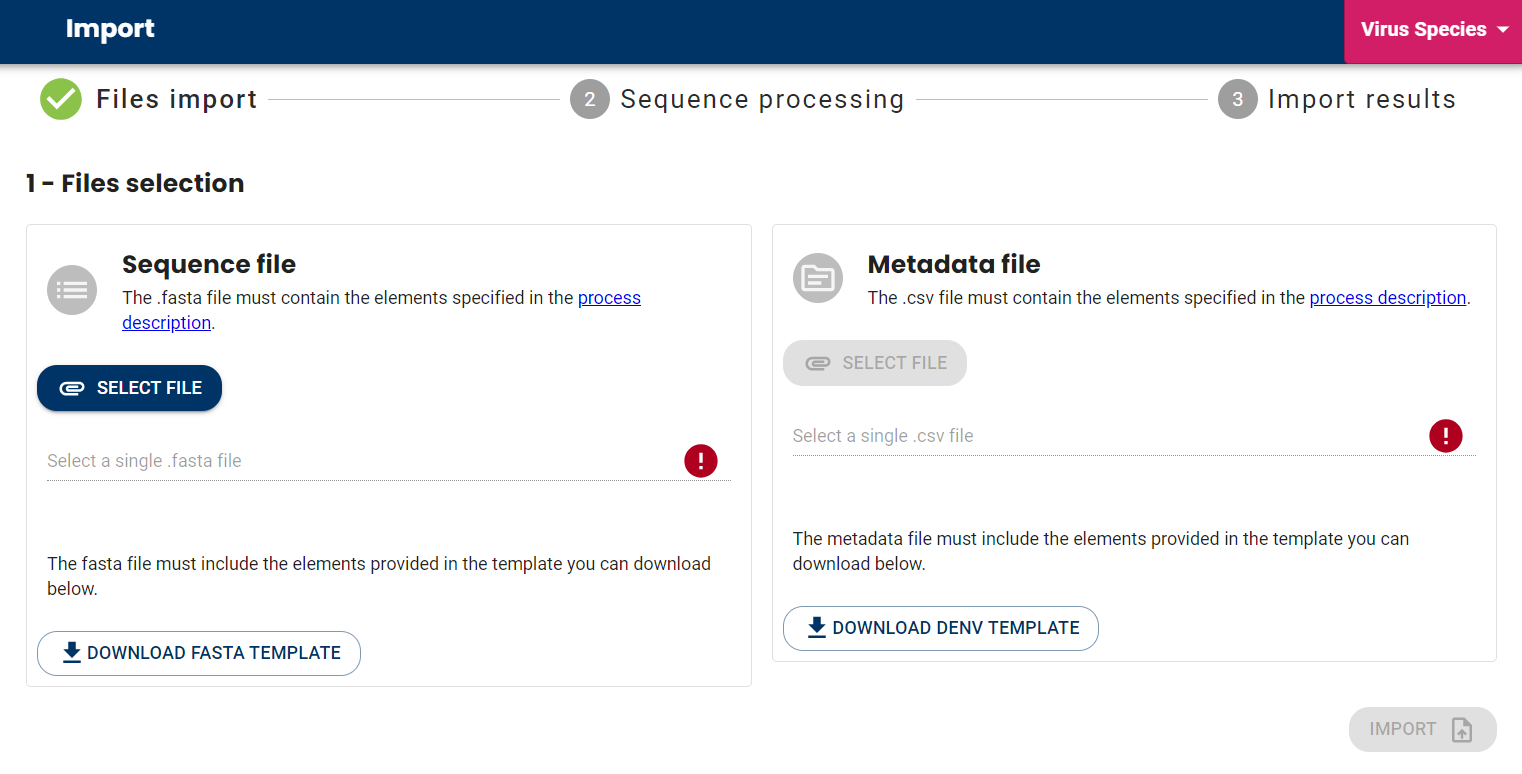
Step 1: Selection of Files to Import
For this step, the first operation is the selection of the files, namely:
- A Fasta file containing one or more genomic sequences of arbovirus-type viruses, as shown in this template.
- A CSV file that includes all the metadata associated with the sequences in the Fasta file. A template CSV file is available for download from the interface, listing all the metadata that can be entered for import. For details and constraints on each field, click here.
Structure of a Fasta File
- Description line: The first line starts with the ”>” character followed by a unique identifier for the sequence.
- Sequence Lines: The following line contains the sequence itself, and consists exclusively of characters representing nucleotides. The sequence line can vary in length.
Once both files are supplied, the “import” button becomes active and turns blue. It’s time to move on to the next step!
Phase 2: Sequence Processing
Clicking on “import” will start the import process and a page will display each of the operations carried out during the process.
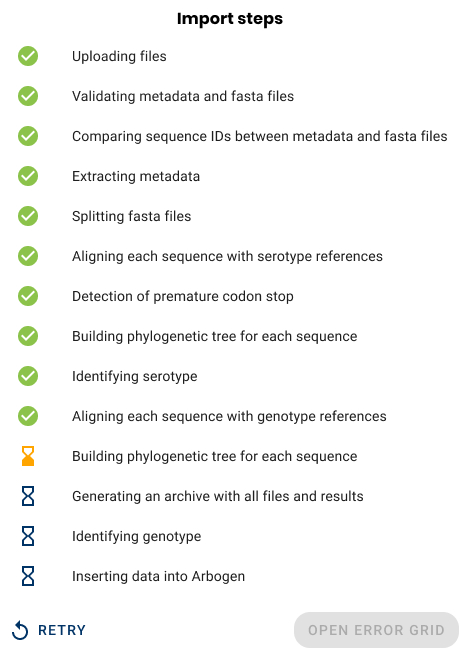
The statuses of each stage are illustrated according to the following legend:
- ⌛️ (Empty hourglass): Stage planned but not started yet
- ⏳ (Hourglass with sand): Stage in progress
- ✅ (Check circle): Stage completed and successfully finished
- ❌ (Cancel): Stage completed and finished with error
In the following diagram, all the steps are distributed across the phases of the process:
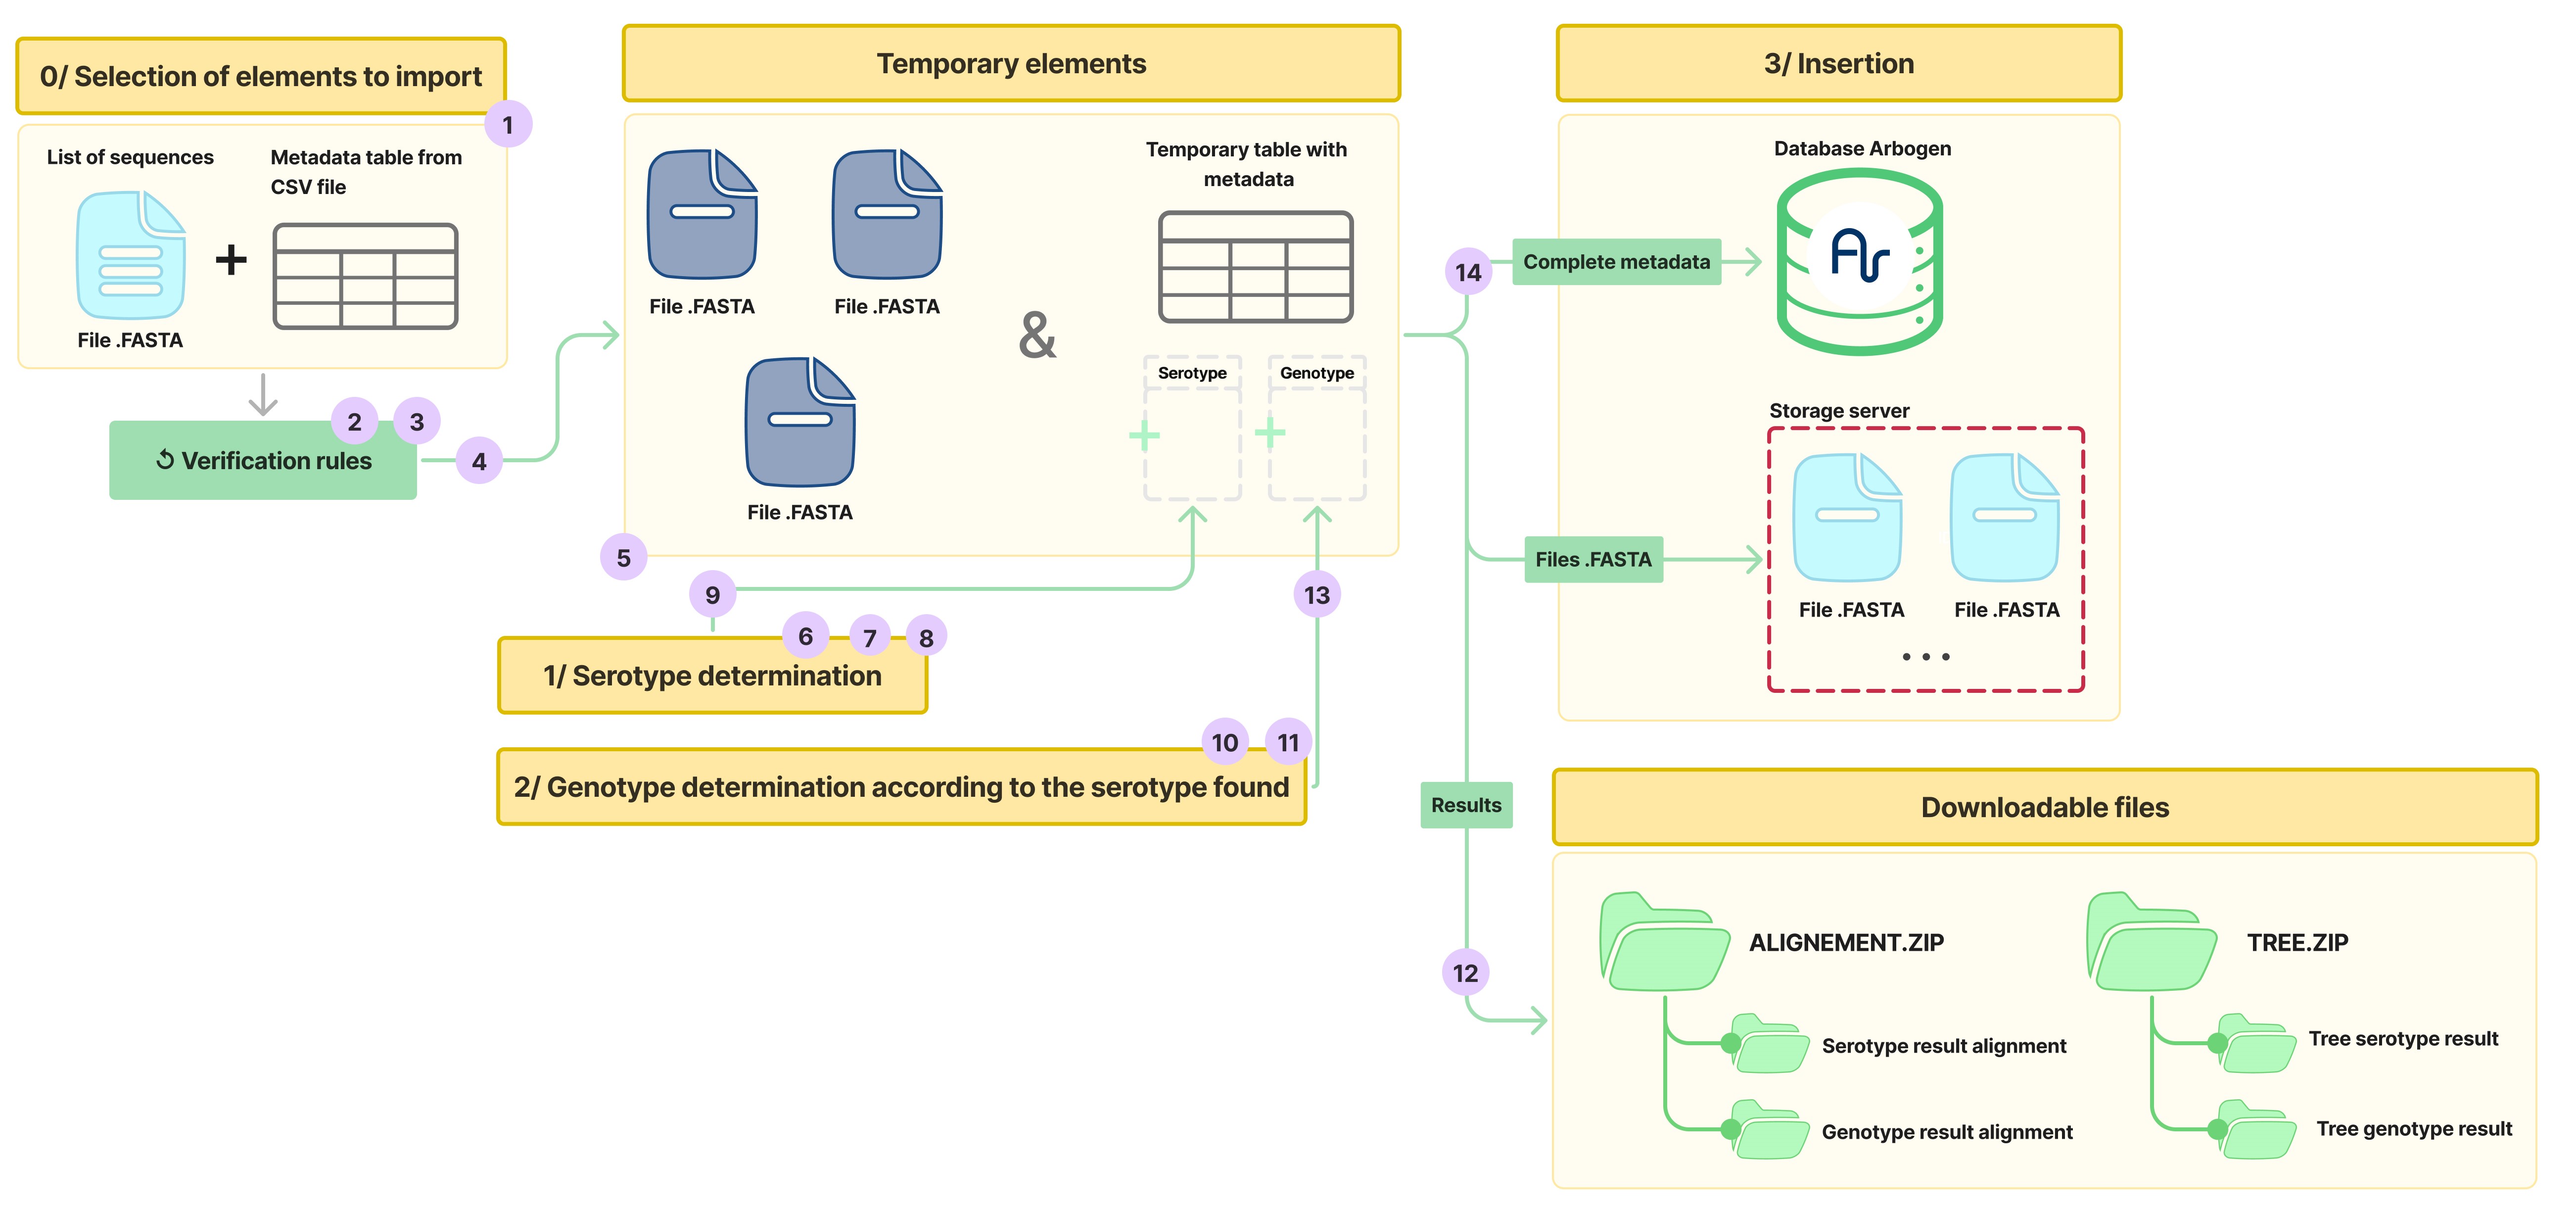
Details of the Operations
Step 1.1: File Upload
Here, the files provided to the Arbogen platform are uploaded for further processing.
Step 2: Validation of the Fasta and Metadata Files
Once the files are received by the platform, several validations are performed. These include validating the format and structure of the uploaded files. A set of rules is also checked to ensure compliance with the metadata field constraints, which you can find here.
Step 3: Comparison of Sequence IDs Between the Two Files
After passing the rules, a final check ensures that the sequence identifiers are the same in both files, controlling that neither file has any missing or extra identifiers.
Step 4: Extraction of Metadata for Temporary Storage
Once all the validation operations are completed, all metadata are extracted from the CSV file and temporarily stored on the platform.
Step 5: Splitting of the Fasta File
If the input Fasta file contains multiple sequences, it is split to create a separate fasta file for each sequence. This step is necessary for the subsequent operations.
Serotype Determination for DENV
The serotype determination phase consists of four steps (6,7,8,9) as shown in the following diagram:
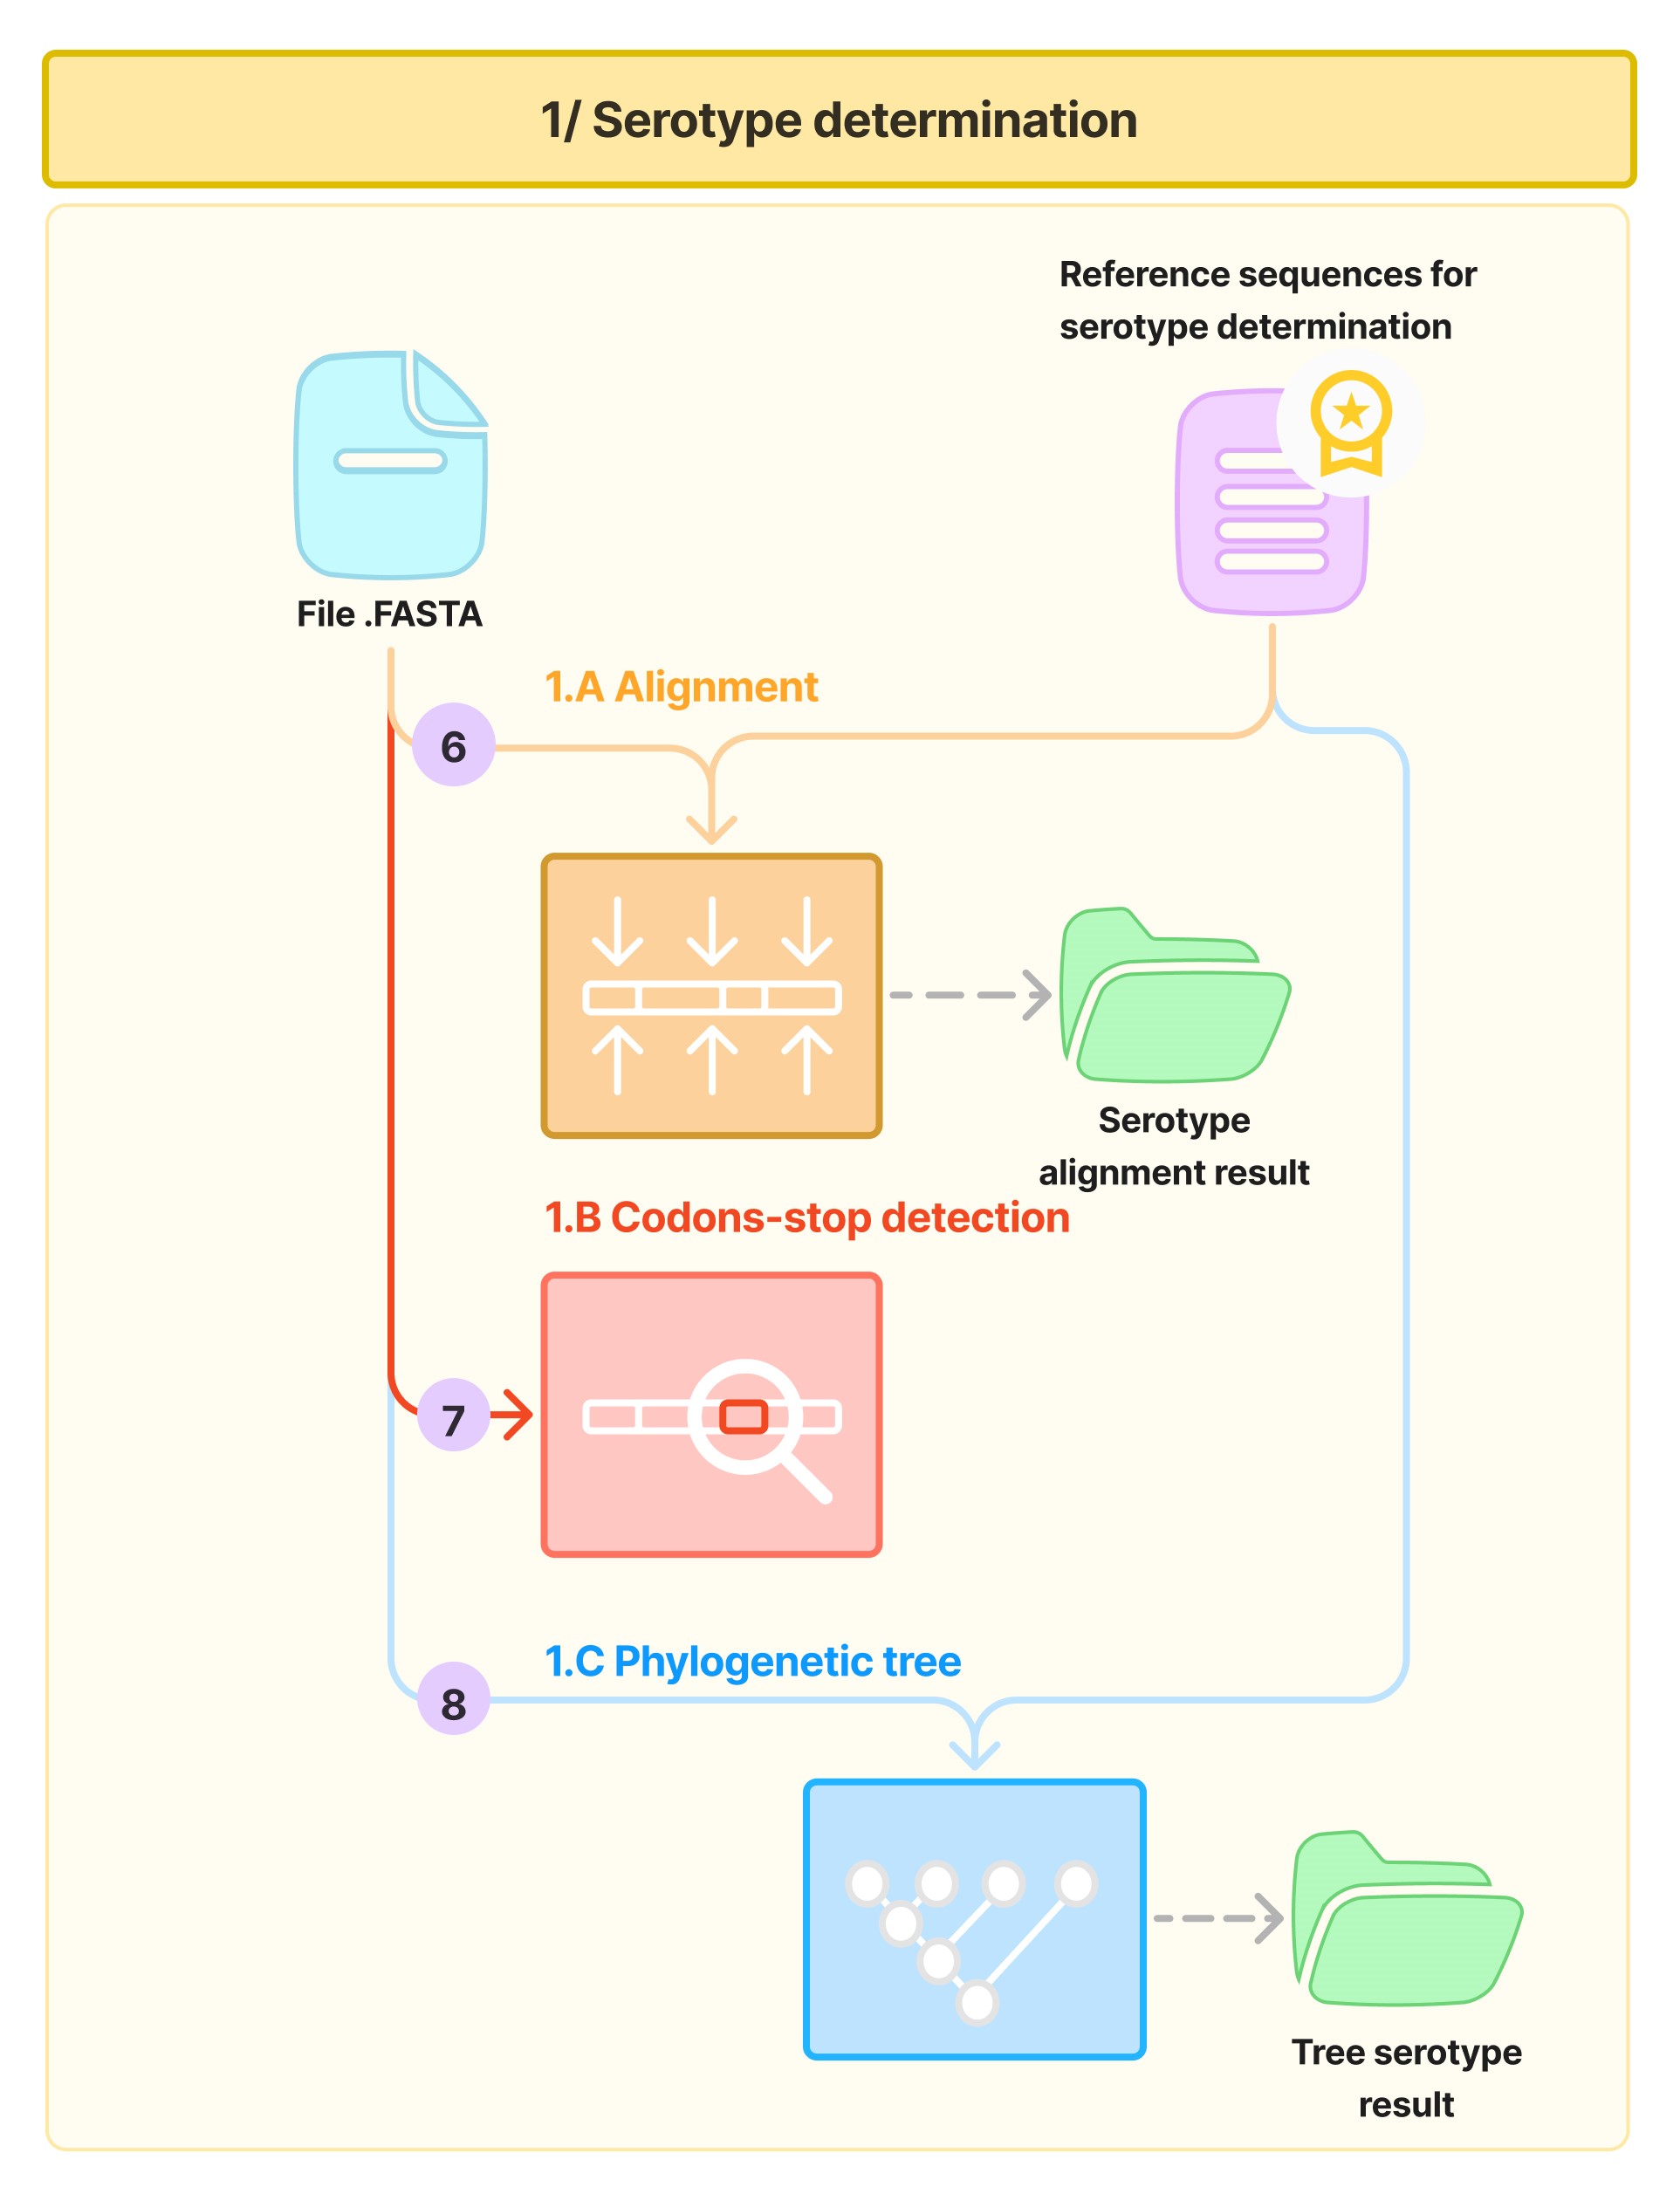
Step 6: Alignment with Serotype Reference Sequences
Each sequence is aligned with a set of serotype reference sequences, which you can find here using mafft.
Step 7: Detection of Stop Codons
Using the resulting alignment, the sequence is screened for any premature stop codon.
Step 8: Construction of Phylogenetic Trees
If no premature stop codon is detected, a phylogenetic tree is constructed based on the alignment with the serotype reference sequences, with a maximum-likelihood approach using iqtree (model: HKY85+F, with 1000 ultrafast bootstrap replicates). Note: all results (alignment files and phylogenetic trees) are saved until the end of the process.
Step 9: Serotype Identification
Using the ML tree obtained in the previous steps, the serotype of the sequence is determined and added to the temporary metadata table.
Genotype Determination for DENV
The genotype determination phase is carried out in three steps (10, 11, 13) as shown in the following diagram:
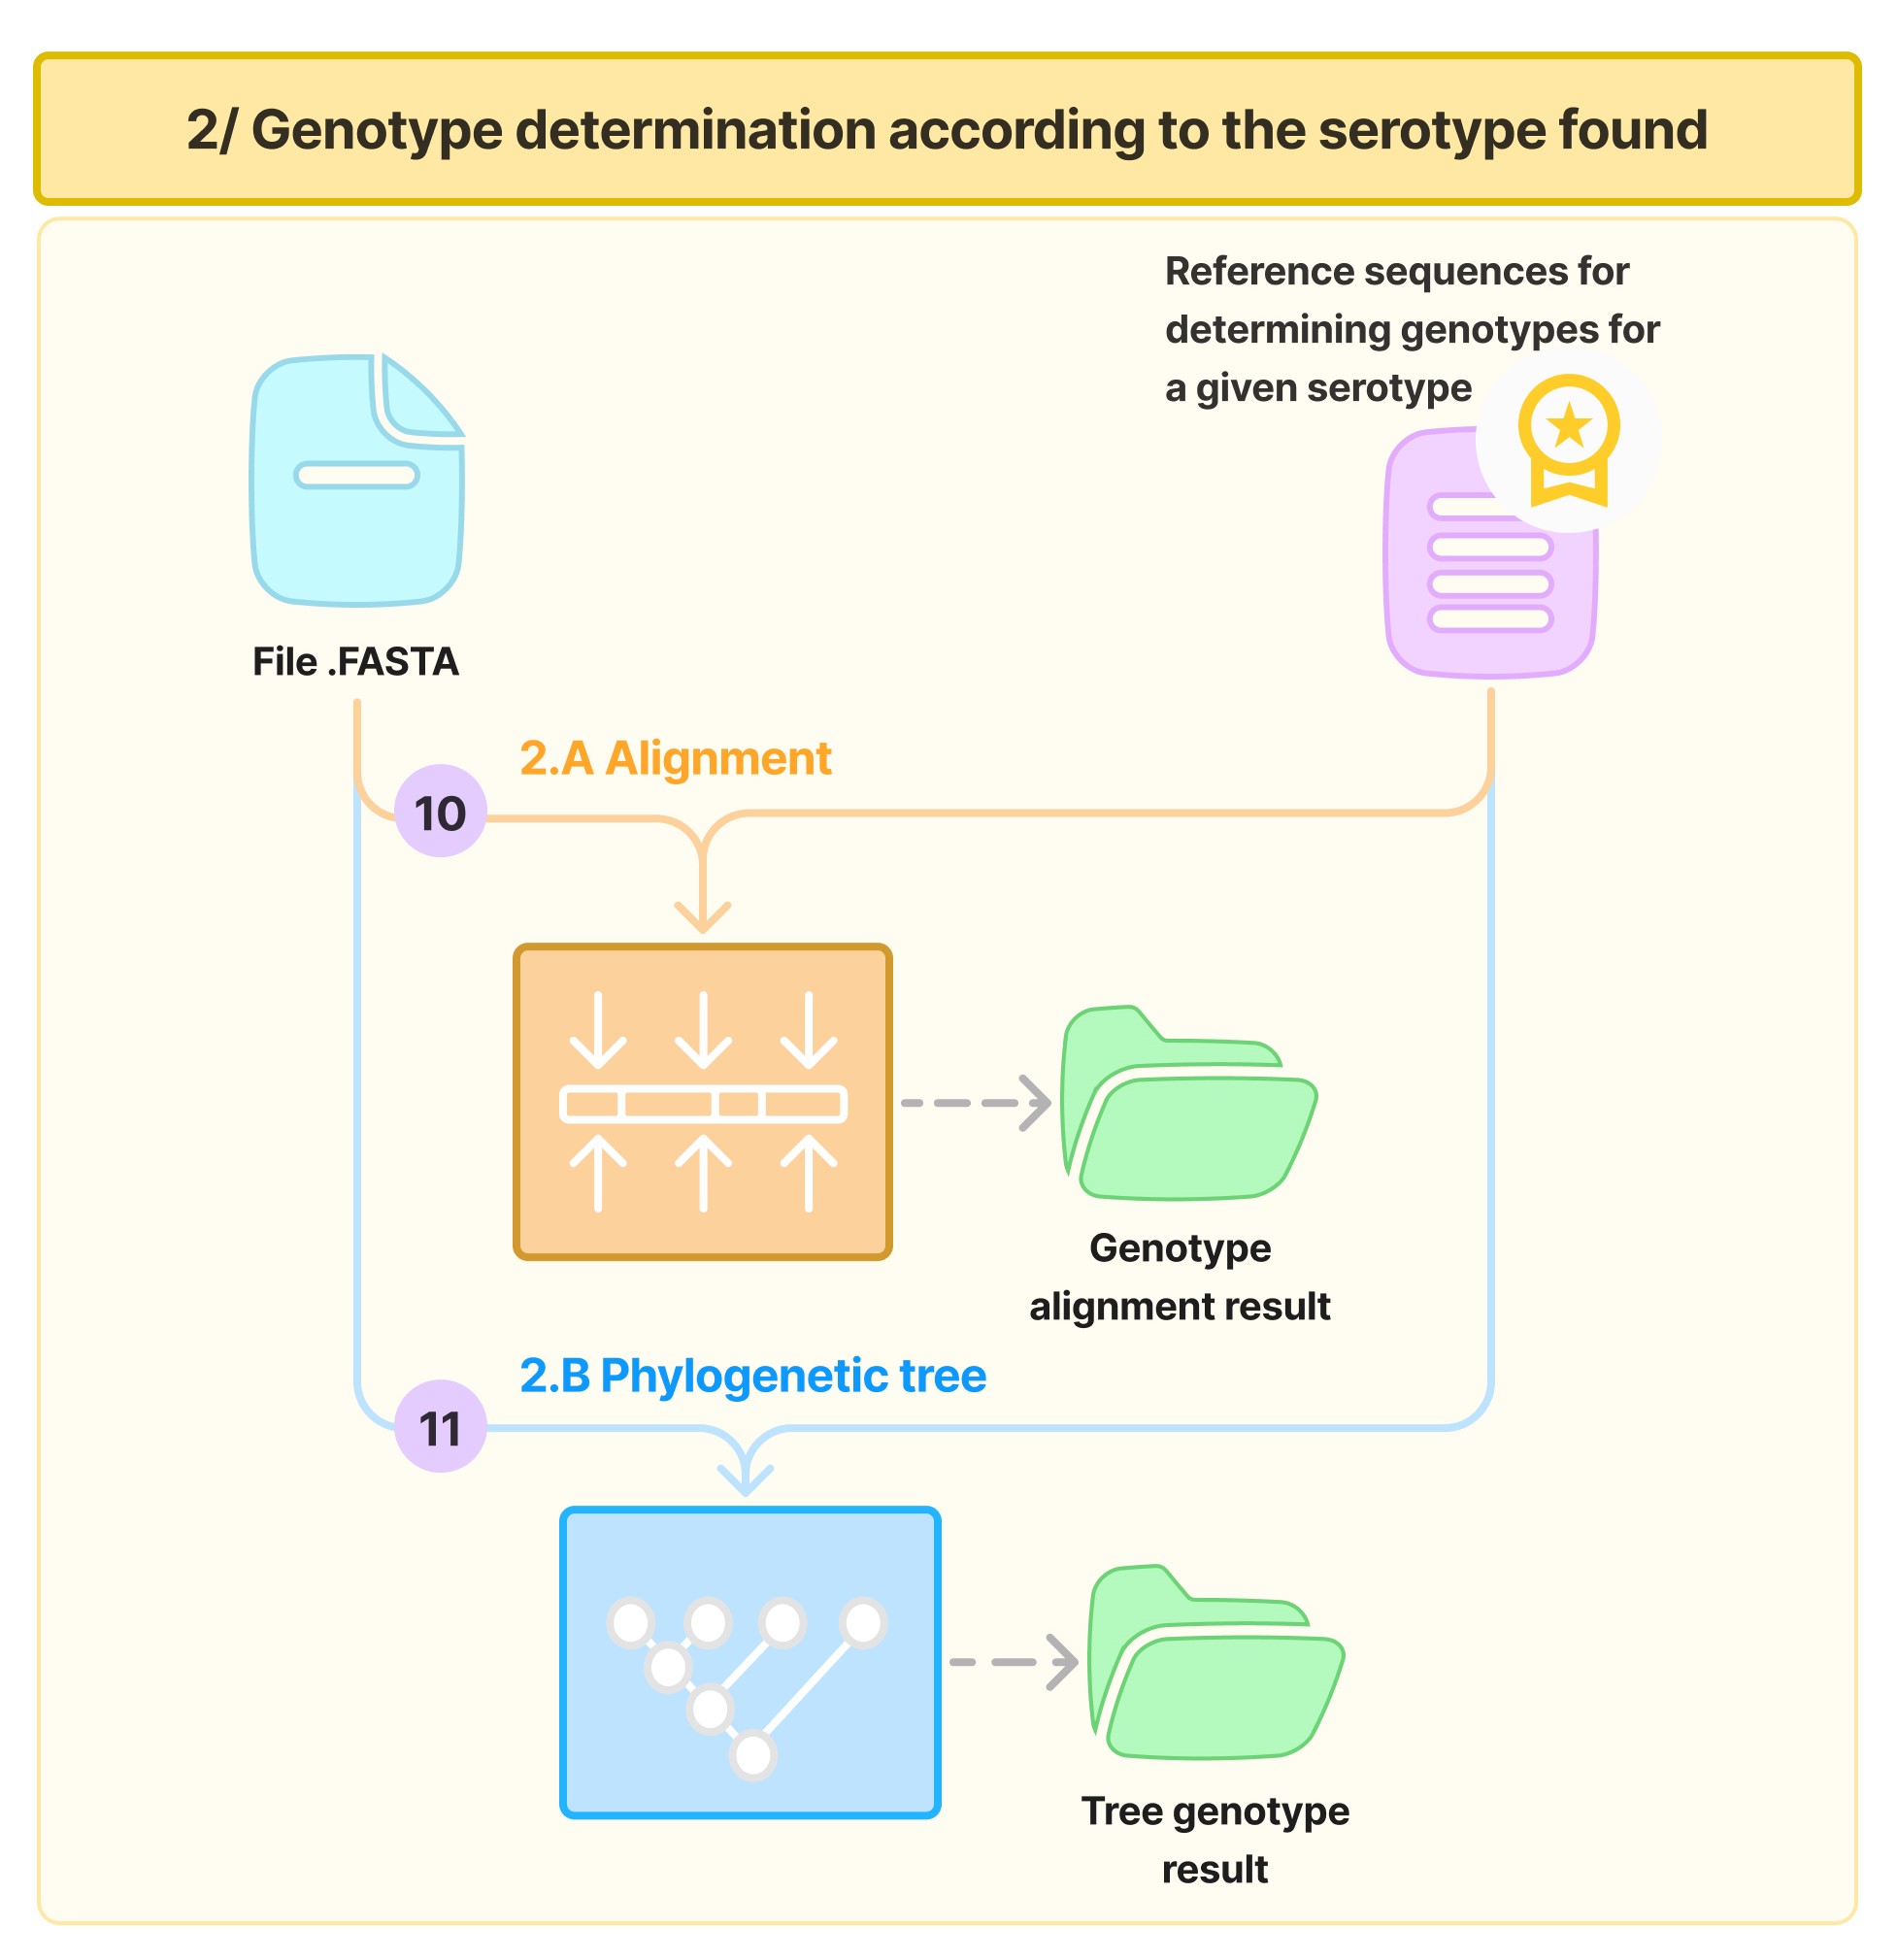
Step 10: Alignment with Genotype Reference Sequences
Each sequence is aligned with the genotype reference sequences, which you can find here, references are selected according to the serotype of the sequence.
Step 11: Construction of Phylogenetic Trees for Genotyping
A phylogenetic tree is constructed based on the alignment with the genotype reference sequences from the relevant serotype, with a maximum-likelihood approach using iqtree (model: HKY85+F, with 1000 ultrafast bootstrap replicates). Note: all results (alignment and tree files) are saved until the end of the process.
Step 12: Generation of the Result Archive
All analysis result files (alignment and phylogenetic tree files) are packaged into downloadable archives, which will be accessible only at the end of the process.
Step 13: Genotype Identification
Using the ML tree obtained in the previous steps, the genotype of the sequence is determined and added to the temporary metadata table.
Phase 3: Import Results
Step 14: Insertion of Data into the Platform
All data (metadata with serotype and genotype results, and individual Fasta files) are inserted into the platform’s database and are now available.